Thursday, June 02, 2005
Using an * (asterisk) with –Psetupin
When using PSETUPIN in a script or macro you’ll want to use –PSETUPIN, this will suppress the dialog box. You will then be prompted for a file to pull the pagesetup from. If you are using a template you need to add the .dwt to the end of the file name. Once you’ve entered the file name you be prompted for the pagesetup which will be pulled into your current drawing. Ok here’s the kicker, by using an * (asterisk) it will pull in all of the pagesetups. If the current drawing already has a few of these pagesetups in it you’ll be prompted to REDEFINE (Y/N). I don’t like to answer the (Y/N) question so I will begin the script or macro with by setting the setvar EXPERT variable to 2, which will suppress the (Y/N) prompt, then end the script by setting the EXPERT variable back to 0.
Below is the syntax for a button menu to pull in all of the pagesetups from the MCMASTER.DWT
while suppressing the (Y/N) question. Yes there is a space after the last 0.
^C^Csetvar;expert;2 -psetupin;mcmaster.dwt;* setvar;expert;0
Below is the syntax for a button menu to pull in all of the pagesetups from the MCMASTER.DWT
while suppressing the (Y/N) question. Yes there is a space after the last 0.
^C^Csetvar;expert;2 -psetupin;mcmaster.dwt;* setvar;expert;0
Tuesday, April 12, 2005
Bell Bottom Pants
Remember back in the day when you would go to bathroom or get coffee while Zooming extents. You would save views for future use or buy third party program that would speed up your zooming and panning. If there was money you could buy an expensive video card to help but not everyone could get one.
A few years later video cards came out with there own processors and memory. then prices dropped. Somehow Autocad under windows didn't need to regen. Realtime panning wasn't a big deal. Transparent zooming from one end to the other was happening in fractions of a second. I never thought I would see these days.
Now with Autocad 2006, we have Smooth Zoom. Select your window or extents and your display smoothy zooms as asked.
Who said we would never see bell bottom pants again?
thanks,
hoogli
Thursday, March 31, 2005
Publishing Directly from the Sheet Set Manager
My favorite thing about the SSM is being able to publish directly from the palette. I select what I want to publish, right click, follow the Publish fly outs to the page setup I want, click, done.
Follow the fly outs and pick a page setup ! 
Let’s look at the Publish choices and what makes this so easy.
After you select the files you want to publish, right click to get to the Publish fly out. From here you have eight choices associated to publishing.
- Publish to DWF – This publishes using the current page setup to a .dwf file. This may not always be what you think it is. If the current page setup was for a drawing to publish a window to an 8 ½x11 sheet size then that’s what your .dwf file will look like, not the full size 30x42 you wanted.
- Publish to Plotter – Similar as above. This again publishes using the current page setup. Be careful you think your plot is going to the plotter and it’s really publishing the current page setup which is to a .dwf. You’ll be standing by your plotter wondering, where’s the plot?
- Publish using page setup overrides – I’ll finish with this one since this is really your best option.
- Include Plot Stamp – Toggles whether or not you want a plot stamp.
- Plot Stamp Setting – This is where you can configure, save and retrieve the plot stamp settings.
- Manage Page Setup – This is good one because you can manage all of your page setups for the template file you’ve selected to use for the Page setup overrides file. The only thing I don’t like is you can’t make a particular page setup current for you active drawing. Hmm, wish list item.
- Sheet Set Publish Options – These settings mainly concern .dwf and a setting to publish directly to Buzzsaw. The one setting you’ll want to always check is the Default output directory (DWF and plot-to-file). If you don’t tell it where to send your files, it by default, will send them to your My Documents folder. This is important because I rarely plot directly to a device.
- Publish Dialog Box – This opens the Publish Dialog Box and populates the Sheets to publish with the sheets you selected from the SSM. Prior to Publish using page setup overrides this is how I would plot entire sets of documents. You’re able to select a page setup for multiple sheets from one file and you can save the entire plot setup to a .dsd file for future plotting.
Now back to Publish using page setup overrides. All of my plotting is done using page setups. Whether I’m plotting directly from a drawing or using the Publish command I always configure and use a page setup. By selecting a particular page setup override this will force the files to plot using that page setup. You don’t have to worry about what you current page setup because they will be override. Or is that overroad? Anyway you’re forcing the issue instead of guessing what the current page setup is.
To use the Publish using page setup overrides correct you must do a couple of things first.
- A template file (.dwt) must be selected for the Page setup overrides file in the Sheet Set Properties dialog box. This file is what populates the Publish using page setup overrides fly out menu from which you’ll select the page setup. My master template file has several configured page setups. I typically copy and rename the master template to the project folder. Now if I have to configure a project specific page setup I can save it this in the project template without having to clutter up my master template.
- By default published files will go the your My Documents folder, or directly to the plot device, unless you specify a Default output directory. See item 7 above.
Everytime I think Autcad couldn't plot any easier Autodesk comes up with something, this time it's using the SSM.
Later,
hoogli
Thursday, March 24, 2005
Drawing Collaboration Etiquette
I've never talked manners or etiquette with drawings until now. Now I’m going to use etiquette while talking about drawing collaboration.
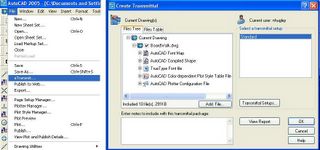
I have listed several items that had happened to me over the years that I think, now today, is just plain collaboration etiquette. I’ve been known to do a few of the things below but I now make a conscious effort to watch my etiquette. But before you scroll down and see the list I thought I would help the cause for better etiquette. Not all items can be solved with one command but several can be with Autocads eTransmit command. It was previously a Bonus Tool called Pack-n-Go. I did use Pack-n-Go and the first release of eTransmit. Only a few times had eTransmit failed me but under Release 2005 once maybe twice. Otherwise I rely on eTransmit for drawing collaboration.
There was a three part series by Mark W. Kiker detailing the use of eTransmit. I’ve listed the links here and also Marks web site, which I have found very useful. Take a look at Mark's three part series and lets try using better etiquette.
eTransmit Part 1 eTransmit Part 2 eTransmit Part 3
Caddmanager Site
Autocad's eTransmit Command
YOU NEED TO WORK ON YOUR DRAWING ETIQUETTE BECAUSE:
- You’ve sent me drawings without the xref’s.
- You’ve sent me drawings to plot but there’s no .ctb.
- You’ve sent me a new base plan that is no longer in the same place as the last one.
- You’ve sent me a base plan in the negative X and Y.
- You’ve sent me drawings without your fonts and all the fractions are in Hebrew.
- You want me to send .plt files to your print house but you have no idea what plotter manufacturer or model number to use.
- You’ve sent me .pdf’s of a 30x42 drawings to be printed on an 8½”x11.
- I don’t know which drawing it is because the file names are Russian serial numbers.
- I’ve sent you drawings like you asked but you forgot to tell me you need them in Release 2000. Hmm I should have asked.
- You’ve asked me to send my drawing files. Ok, send .zip file. Mail pukes. Oh, my mailbox is limited to 3meg file attachments. Ok re-send several .zip files. Mail pukes. Oh, my mailbox doesn’t accept .zip files, please rename extension. Third times a charm. Thank you sir may I have another.
- You’ve sent me your title block but forgot the block to insert for the sheet name and number.
- You insist on plotting my dwg’s so I send you all the files including the support files but when I get our record set of drawings the bottom margin is cut off and the fonts are replaced?
- You’re still plotting from model space.
- I need one of your 10 plotted building sections you send me the one resource drawing. From model space I zoom extents and now see the 20 sections drawn from an orbiting satellite. Hmm which one is it?
- You send me your resource drawing of the building elevations. The building only has four sides. Hmm which of the 12 elevations do I use?
- You’re one base plan has all three floors and roof, lined up either up and down or left and right.
- You’re base plans for the three floors and roof don’t line up when over laid.You’re architectural plan is in decimal units.
Thursday, March 17, 2005
How are companies using the Sheet Set Manager (SSM) ?
(old post from June 2004)
At what level are they taking the SSM ?
Is all the work in setting up the callout and label blocks really worth it. Renumber whole sheets is easy, but can you move one detail from a sheet to another and not loose the link. What's the "View List" and category for other than internal organization ? This is a lot to digest and I would really like to hear from someone else.
I've done all of the tutorials. Read magazine's. I have been searching the internet and my CAD soul to come up with a way to use the SSM to it's limit but yet make it as simple as possible to use. Most everything I find so far is the basics. How to use the SSM wizard with your existing projects, How to use the fields in title blocks and sheet indexes. I've also found some things (very little) on how to setup the linked callouts and labels.
This I know for sure! There are (3) levels in which to use the SSM.
Level 1 - Out of the Box Sheet Management
Creating sheet sets with the wizard using our existing drawings mirrors the way our production folders and files already setup. Our file and layout tab naming all falls right into place with the wizard. I use the publish feature, including saving our sheet sets for future publishing. My thought that’s easy, the SSM as just an extension of the publish command.
Level 2 - Advanced Sheet Set Manager
This is using the sheet set manager just short of using fields for title blocks and linked callouts. In a nut shell you are creating your models with resource drawings and placing named model space views on to paper space (predefined sheet and/or project specific template).
Resource files are building models, plans, elevations and sections. The resource files will not have title blocks, layouts etc.. and their file names will be more of a description of what that drawing is, foundation, framing etc.
The plotted sheets that are listed in the "Sheet List" tab will be just that, for plotting only. Even at this level using the SSM requires some thinking about project templates, file names, view naming etc…..As for what entitles are really drawn in the "Sheet List" plotted drawings, very little. At this point you're not using fields so I don't know why you would be using the "View List" tab. I know what it does and how to create categories but I obviously don’t get this tab until you are renaming and numbering with callouts and labels. Maybe that's the point you don’t' have to use this tab until you get to Level 3.
Level 3 - Sheet Set Manager on Roids
It's Level 1 + Level 2 all rolled together = Level 3. At this point you are more than just drawing lines but coordinating your drawing set with more than just the command line, folders and filenames. You are linking your drawings thru a conduit (the Sheet Set Manager Palette) to each other and taking advantage of linked, updated fields. I do think this is "complex" or above and beyond what an average "CAD Operator" has been doing for the past few years.
Now there is hidden time in these drawings that is not seen as lines and text, but as pregame setup to get to the game. I really have to look at changing the way we develop and put together our drawings. Yes I have standards, customized menu's, lisp etc…..All of which will be used again but will have to be massaged and redirect to put our drawings together in a linked (smart) set of drawings.
I want to go to Level 3 and I would like some feedback from anybody before I proceed. So if you are not tired of reading this l let me share some of the road blocks I have come across and see if you've come to them yourself and maybe you can or someone else can shed some light on which way to go.
Plan and elevation sheets are the no brainer. I have this under control. Create resource drawings of plans with simples names for files and views.
Detail sheets that’s another story.
History lesson first. Currently I draw a sheet's worth of details in model space, including the label blocks, then make one view in paper space. It get's a little more involved with multiple dimscales. Actually I create our details drawings applying Joseph Reams' "Detail, Details and More Details" class from Autodesk University 2002.
So with that in mind applying this to the Level 3 doesn't work out all that well. Here's why. I can put 20 details on plot sheet "A" but I've drawn 25 details in the resource file. For linking I need 25 named model space views. Now I start dropping these views on to paper space and place the label block. Which in turn I now place the callout block on the plan using the "View List" tab (see now this tab makes since). Not all of the details are on sheets yet, so I start a new sheet "B" placing the remaining 5 details and coord them on the plan with callouts.
This is where problems start to happen. I want to replace detail 3 on sheet "A" with detail 1 from sheet "B".
The easy one first.
I remove detail 1 from sheet "B". I use the "View List" and re-number sheet "B". Save the drawing and all of the plan callouts are updated and sheet "B" is done.
Now, how do I get detail 1 from sheet "B" to sheet "A" without loosing the link. I can cut and paste from "B" to "A" ? No I can't it's lost it's link.I have place the detail on the sheet from scratch and apply the callout on the plan all over again. If it's one detail and one callout fine but if it's one detail and the callout has been placed multiple times on more than one plan I have to re-place all of the callouts again. This doesn't see right ? I've "re-pathed the link from plan callout to a moved detail but again if there are 20 plan callouts you have to do this 20 times ?
What am I missing.
How do you move a detail from one sheet to another without breaking the link and having to start from scratch, in particular replacing multiple plan callouts of the same label reference.
Let's look at a few other things I am currently doing that doesn't work well to get to the Level 3.
If I have 3 resource drawings with 25 details in each. I can place 20 of these details on 4 plotted sheets. I start plucking details onto sheets and now any one sheet can have up to 3 resource drawings xrefed in to make up that one plotted sheet. Is that good or bad. What are you using for view names in the resource drawings ?
Now let's take a look at a new plan of attack for detail sheets.
Draw each detail and save as it's own file. 100 details = 100 files. Have the model space view name match the file name. I can pluck these details on to sheets to my hearts content. This makes it so that only the details that are on the plotted sheets are only the details xrefed in. I match my "View List" category per plotted sheet so I can see which files are on what plotted sheet. I can plot books of details on 8 1/2 x 11 having the details in individual files and I can mix and match details on sheets as needed.
But I still can not move a detail from one sheet to another without breaking the link.
I could go on about this topic but I'll stop there. Any feed back would be appreciated.
![]()